Прибегнуть к изготовлению прямотока самостоятельно – это значит увеличить тягу своего автомобиля. Но теперь транспортное средство будет более громким за счет выплеска мощного потока газов. Звук будет похож на движение спортивных машин. Но важно, чтобы «банка» не просто ревела, а издвала приятный звук. Как же правильно выполнить прямоток своими руками и устранить лишний шум? Рассмотрим прямо сейчас.
Что такое прямоток?
Если вы не знаете, как сделать прямоток своими руками (фото работ представлены в нашей статье), то стоит осваивать информацию с самого начала этого несложного процесса. На сегодняшний день многие мастерские занимаются модернизацией транспортных средств. И если в любом городе вам могут только поменять масло, перекрасить ваш автомобиль и привнести иные новшества, то в более профессиональных мастерских можно переработать обычную машину в спортивную. Одним из способов модернизации является установка прямотока.
Прямоток – та деталь, которая придает звук вашему транспортному средству. При этом все операции могут производиться самостоятельно. Необходимо лишь взять набор инструментов и материалов. А если говорить о статистике, то прямоток можно встретить больше на отечественных автомобилях. Новшества обычно вводят владельцы «девяток», «шестерок» и иных моделей АвтоВАЗа. Изготавливается своими руками прямоток на ВАЗ при этом достаточно просто. И даже если операция будет проведена неправильно, вы не потеряете больших денег. Если же вы сделаете все правильно, то эффект вас сильно порадует.
Что такое сайленсер?
Он представляет собой заглушку, которая устанавливается для уменьшения звука прямотока. По размерам данная часть должна совпадать с конечным диаметром выхлопной трубы. Сайленсер по размерам берется немного меньше, потому что заглушка вставляется в саму «банку». Помимо этого, для крепления используются несколько болтов, чтобы при необходимости его можно было снять простыми подручными инструментами. А если вы хотите провести данную процедуру на автомобиле, то такой процесс не займет много времени.
Некоторые особенности, которые нужно знать еще до установки
Если вы не знаете, как сделать прямоток на ВАЗ своими руками, то это не проблема. Конечно, многие водители захотят приобрести уже готовое дополнение, но здесь имеется несколько нюансов. Прежде чем начать изготавливать или устанавливать готовый глушитель, нужно изучить принцип его работы и функции элементов.
До установки комбинация глушителя и карбюратора работает как единое целое и позволяет поддерживать правильное количество воздуха на входе и на выходе. При установке прямотока происходит разбалансирование системы. Это может привести к дальнейшим проблемам в двигателе. Основным правилом, которое необходимо знать и соблюдать, является то, что сделанный своими руками прямоток не дает никакого эффекта помимо усиления звука, если не проводить иные работы по усовершенствованию других узлов. Сюда может входить увеличение качества системы питания в моторе, настройка подачи топлива, фильтрация воздуха и многое другое.
Спортивный и стандартный глушитель: в чем разница?
Прямоток, своими руками изготовленный, представляет собой трубу, которая не имеет никаких поворотов. Хотя в некоторых местах она может сужаться и расширяться. В этом случае выхлоп может позволять отработанным газам вылетать без каких-либо преград. Стандартный же глушитель, который устанавливается на все автомобили, представляет собой систему, позволяющую снизить шум от газов. Именно по этой причине здесь имеется много поворотов и неровностей.
Для чего нужен глушитель?
Всем известно, что отработанные газы после камеры сгорания попадают под давлением в выпускной коллектор, а оттуда по задней части автомобиля в трубах доходят до атмосферного воздуха. При этом с прямотоком создается достаточно громкий процесс, а без него он будет тише. Помимо этого, изготовленный своими руками прямоток добавляет мотору до 5 процентов мощности. Именно поэтому многие и пытаются установить данную конструкцию, чтобы модернизировать автомобиль. Стоит отметить, что громкость звука может достигать 120 децибел (это находится в рамках дозволенного).
Достоинства прямотока
Среди основных плюсов можно отметить следующие:
- Диаметр трубы увеличивается, что повышает продувку цилиндров.
- Усиливается мощность.
- В соединении меньше изгибов, то есть пропускная способность тоже возрастает.
- При изготовлении используются только качественные материалы в виде нержавеющей стали. Это позволяет увеличивать срок эксплуатации.
Недостатки конструкции
Среди основных минусов можно отметить следующие:
- Повышенный уровень шума.
- В таких конструкциях обычно нет катализаторов, поэтому их нельзя использовать по экологическим нормам.
- Двигатель дольше прогревается в зимнее время.
- Уменьшается клиренс автомобиля.

Основные детали прямоточной системы
Прямоточная система на любом автомобиле станет грамотно работать только в том случае, когда все детали будут оптимизированы под модель. Установка только самого глушителя даст частичный результат. В целом система будет состоять из следующих компонентов:
- Коллектор. Выполняется он из нержавеющей стали, что уменьшает вес и дает возможность сделать конфигурацию с зонами разрешения. Это позволяет убрать сопротивление потока газов.
- Катализатор. Обычно здесь происходит замена на спортивный вариант (пламегаситель), который имеет повышенную пропускную способность. Также возможна замена и на простую трубу.
- Резонатор. Здесь имеется возможность полностью убрать данную деталь либо заменить на спортивную.
- Глушитель. Размеры и длина будут зависеть только от того, стоит ли резонатор или его нет.
Как сделать глушитель-прямоток своими руками? Такой самодельный глушитель на сегодняшний день имеет широкое распространение у многих автомобилистов. И каждый из них может похвастаться какой-то определенной технологией установки. Ниже мы опишем один из самых популярных вариантов.
Необходимые материалы
Среди основных материалов и инструментов, которые могут понадобиться, отметим следующие:
- Железная труба с отверстием диаметров 52 миллиметра. Такой вариант прекрасно подойдет для российских автомобилей, выпущенных на АвтоВАЗе.
- Аппарат для сварки.
- Болгарка, которая может работать для резки металла.
- Металлический ершик (50 штук).
Процесс проведения работы
После того когда все материалы будут готовы, вы можете приступать к модернизации своего глушителя. При этом важно соблюдать последовательность простейших действий:
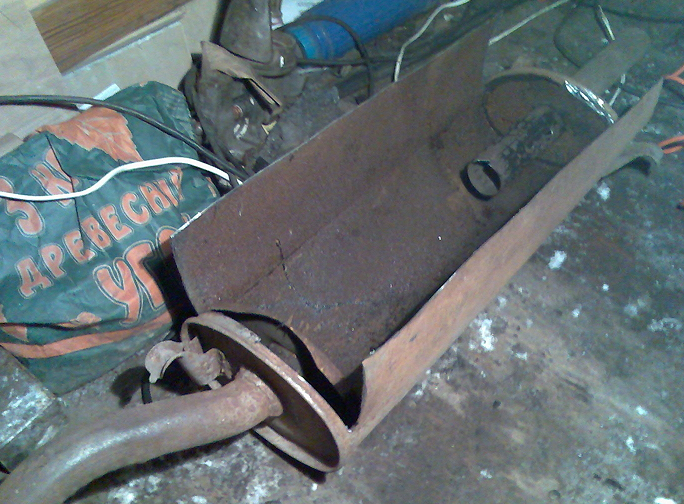
- Прежний глушитель демонтируются из автомобиля. При помощи болгарки вырезается желоб по длине резонатора.
- Все внутренние элементы вырезаются при помощи болгарки. Сюда будут входить трубы, ребра жесткости и многое другое. При этом трубы выпиливают, оставляя с каждой стороны по 30 миллиметров. Это необходимо для того, чтобы новая могла привариваться к старой.
- Подготовленный новый вариант трубы обрезается по размерам. Они должны быть такими, чтобы деталь идеально встала в глушитель.
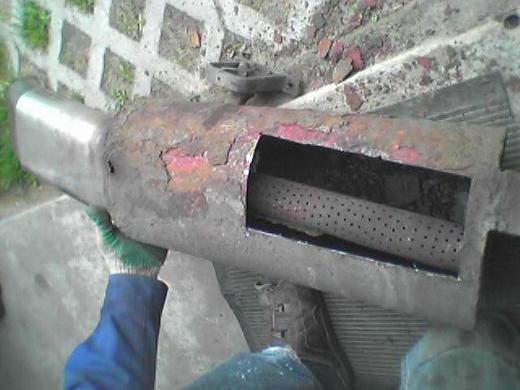
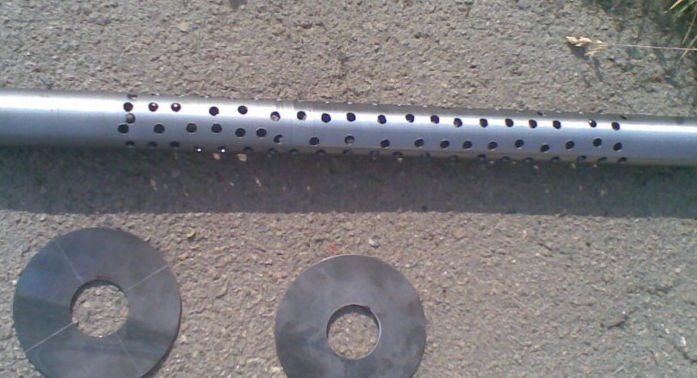
- На трубе проделываются отверстия через каждые 20 миллиметров. Их можно сделать в виде надрезов или дырок.
- Полученный компонент с надрезами приваривается к концам резонаторный трубы.
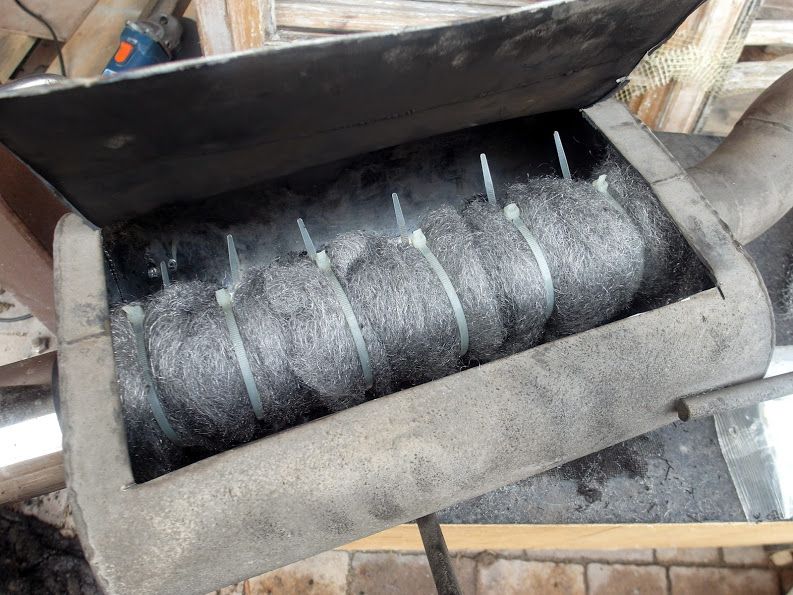
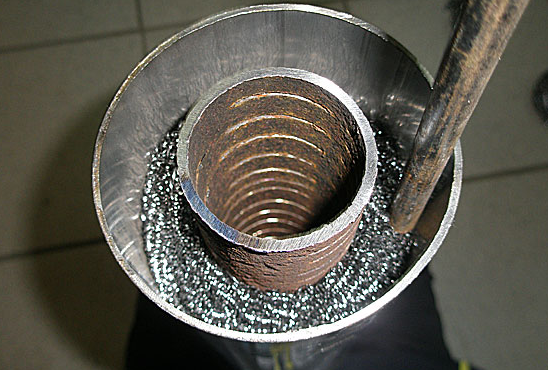
- Свободное пространство заделывается ершиками. Их можно купить в любом хозяйственном магазине.
- Первоначально вырезанная часть резонатора накрывается крышкой и приваривается.
- Конец от глушителя обрезается.
- Устанавливается новая труба и происходит сварка.
Если вы решили выполнить прямоток на мотоцикл своими руками, то процедура будет аналогичной, как и для автомобиля.
Рекомендации
Очень часто многие эксперты рекомендуют защищать глушитель, а в дальнейшем обрабатывать его при помощи грунтовки и какой-либо краски. Все это позволяет увеличить срок эксплуатации и убрать всевозможные проблемы в последующем. Делать это нужно еще перед установкой. В итоге вы получаете качественный самодельный прямоток, стоимость которого будет достаточно низкой.
Но как же сделать глушитель тише?
Тихий прямоток своими руками выполнить сразу нельзя. Многие после установки такого глушителя хотят сделать его тише. В этом случае используется такая несложная конструкция, как флейта. Она представляет собой перфорированную трубу длиной до 25 сантиметров, на конце которой приваривается шайба. Последняя играет роль заглушки. Крепится конструкция на болтах внутри самого прямотока.
Если у вас имеется желание, некоторые знания и навыки, флейту для прямотока своими руками можно выполнить при помощи минимального набора материалов и инструментов. Получится достаточно дешевый вариант, который будет лучше, чем китайский аналог. При этом вам потребуется труба из нержавеющей стали диаметром 20 миллиметров, а также листовой металл толщиной толщиной до одного миллиметра. Сварка лучше всего подойдет дуговая. Не стоит забывать и о правилах безопасности.

К трубе приваривается заглушка с отверстиями из листа металла. Далее прикручиваются болты в количестве нескольких штук. При изготовлении лучше всего точно измерить диаметр прямотока у среза, чтобы заглушка входила недостаточно плотно, но при этом не было зазора. Важно помнить, что такая установка также может уменьшить мощность двигателя. Ведь сделать процесс вывода газов тише без потерь точно не получится. Именно поэтому стоит сразу подумать о том, нужно ли вам данное дополнение или вы хотите остаться на прежней мощности, но при этом постоянно терпеть громкие звуки из вашего двигателя.
Вместо заключения
Итак, мы выяснили, как изготовить прямоток. Как видите, сделать самодельный спортивный глушитель вполне реально даже при наличии минимального набора инструментов.
Прямоток своими руками
Автор admin На чтение 5 мин. Просмотров 110
Мощность двигателя – тот фактор, на который обращают внимание в первую очередь при знакомстве с автомобилем. Да и в дальнейшем про нее никогда не забывают. Кроме того, у многих порой возникает желание ее увеличить. И одним из способов, позволяющих добиться этого, будет прямоточный глушитель или прямоток, установленный на серийный автомобиль.
Общие сведения о выхлопной системе (ВС)
Как известно, глушитель является частью выхлопной системы, и о ней необходимо вспомнить, прежде чем начинать разбираться с тем, что такое прямоток. Она выполняет больше задач, чем может показаться на первый взгляд. Самая первая и очевидная – отвод выхлопных газов автомобиля. Другой, не менее важной функцией ВС будет обеспечение вентиляции цилиндров двигателя.
Достигается это достаточно оригинальным способом – в момент закрытия клапанов одного цилиндра в выпускном коллекторе создается разрежение, которое перемещается по системе со скоростью звука. Отразившись от препятствий, оно возвращается в коллектор к моменту открытия следующего клапана, создавая на выходе из цилиндра область пониженного давления, тем самым улучшая вентиляцию и продувку внутреннего объема.
Скорость и время перемещения разрежения зависят от длины пути (выхлопных труб) и оборотов двигателя, но это учтено при расчете штатной выхлопной системы. Ну и еще одной ее задачей будет борьба с шумом, чем и занимается на машине глушитель. В целом традиционную ВС можно представить, как показано на картинке.
Устройство прямоточного глушителя автомобиля
При тюнинге автомобиля зачастую вместо обычного ставят прямоточный глушитель. С чем это связано? Дело в том, что прямоток позволяет решить две задачи:
- изменить звук, сделав его басовитым и рычащим, что создает впечатление мощного, «заряженного» автомобиля, хотя на самом деле это может быть и не так;
- немного, на несколько лошадиных сил, увеличить фактическую мощность мотора, снизив потери на преодоление сопротивления движению выхлопных газов в глушителе.
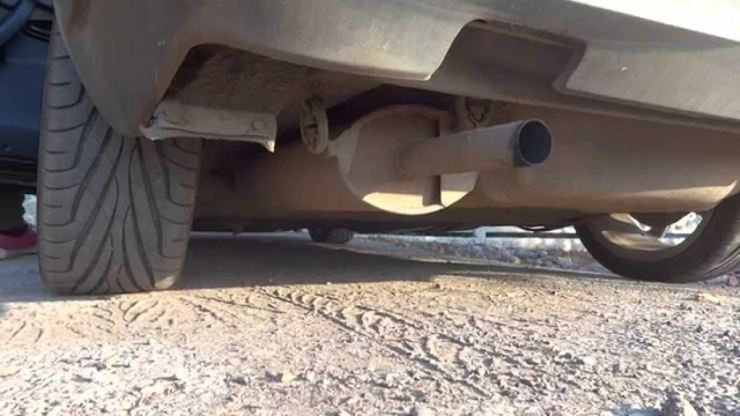
Теперь, когда мы разобрались, что дает прямоток, можно изучить его устройство. Сравнить, как выглядит прямоточный глушитель (один из его возможных вариантов) и штатный, можно на приведенном ниже рисунке.

Как видно, разница заключается в том, что прямоточный глушитель имеет более простое устройство. Такое упрощение позволяет во многих случаях изготовить самодельный прямоток, особенно для машин отечественного производства, например, ВАЗ 2114.
Как сделать прямоточный глушитель своими руками
Обычно причиной установить прямоточный глушитель на свой автомобиль, например, ВАЗ 2114, является желание выделиться среди других, обратить на себя внимание. Самое простое, как можно достичь подобного – изменить звук, издаваемый машиной. Учитывая, что прямоточный глушитель своими руками сделать легко, каждое такое самодельное устройство может иметь свою, отличающуюся конструкцию.
Поэтому нет необходимости полностью описывать, например, прямоток на ВАЗ 2109 или прямоток на ВАЗ 2106, достаточно привести общий принцип, согласно которому и создается такое устройство. Обычно когда рассматривается, как сделать прямоток своими руками, в качестве заготовки используется обычный глушитель, особенно если делается прямоток на ВАЗ или для какого-то аналогичного автомобиля (например, ВАЗ 2114).
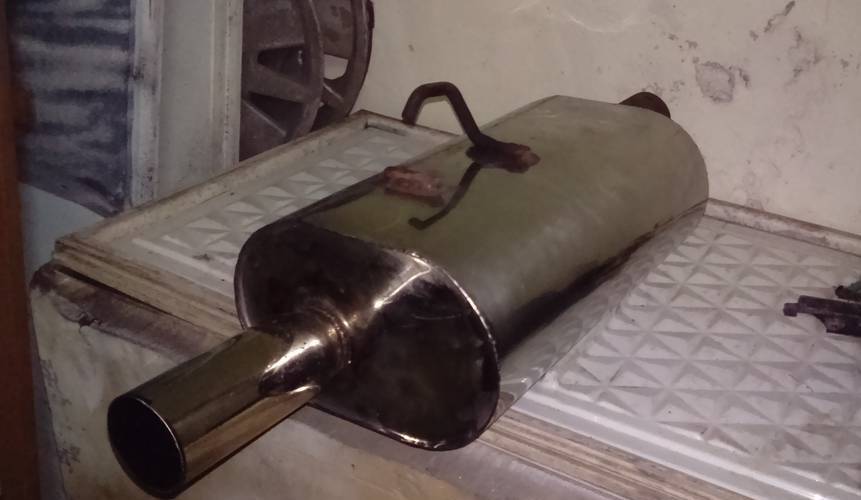
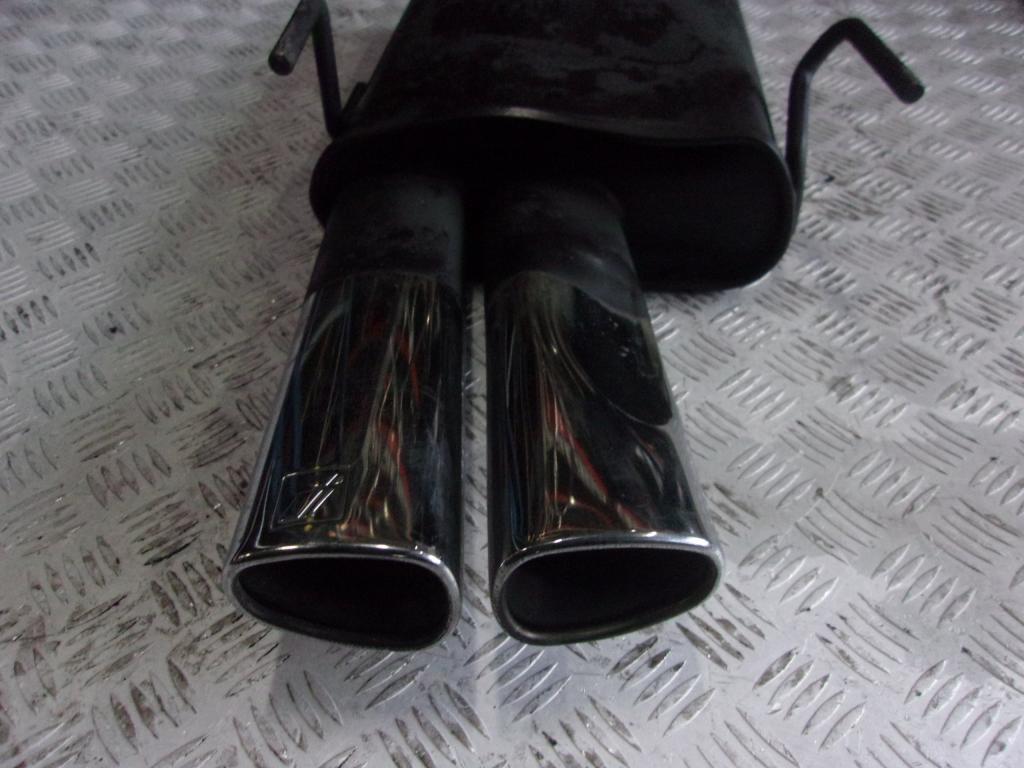
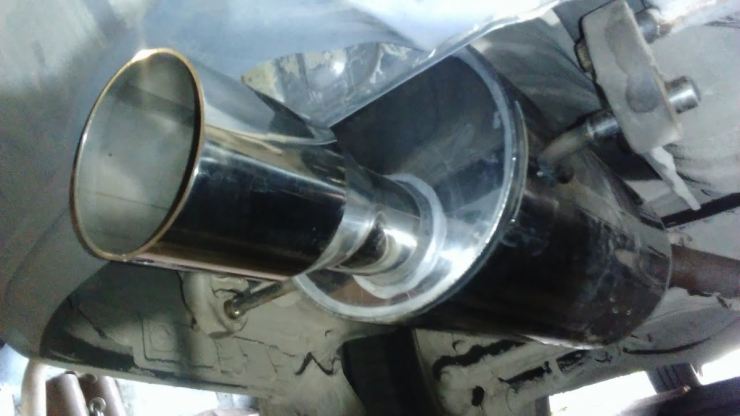
С него снимается штатный глушитель, и затем он вскрывается при помощи болгарки, а все внутренние перегородки и трубы убираются. Получается заготовка глушителя прямотока, как показано на фото.
А вот дальше, когда делается прямоток своими руками, начинается творчество. Хотя в этом случае нельзя говорить о настоящем прямотоке. Дело в том, что в большей части речь идет о глушителе прямотока.
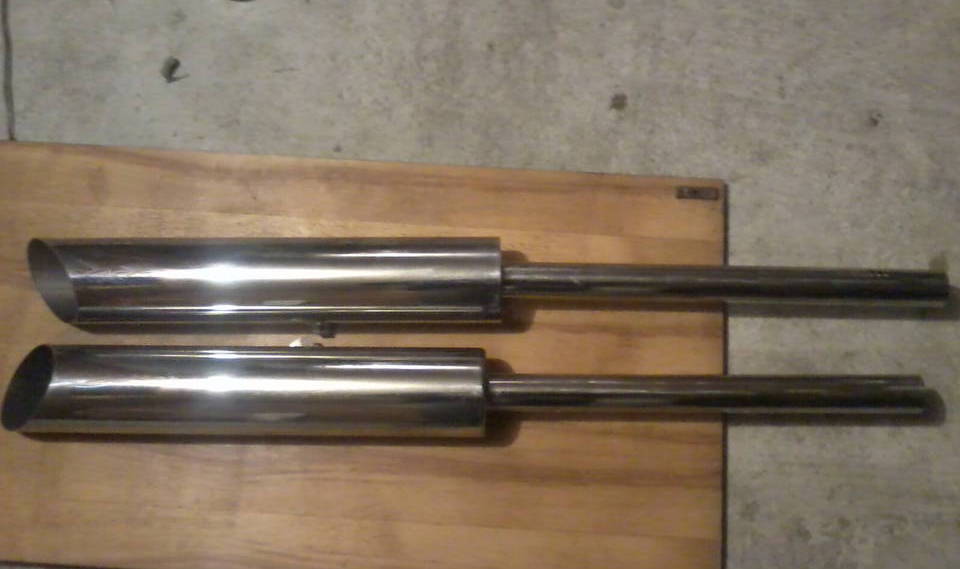
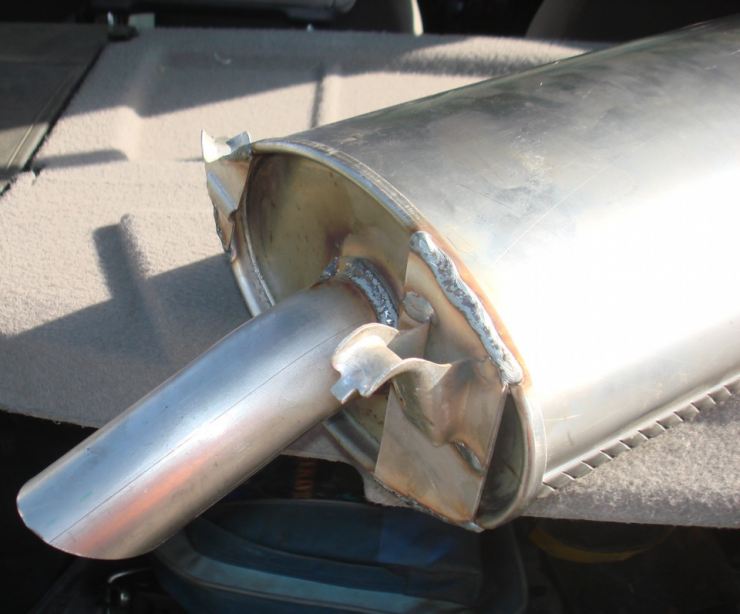
Существуют самые разные варианты его реализации. Кто-то вваривает между торцами одну трубу, кто-то две, а кто-то устраивает несколько отделений и дополнительно использует асбест, базальтовую вату, металлические стружки для снижения шума мотора автомобиля. Различные примеры, показывающие как сделать прямоток, показаны на фото ниже.
Причем приведенными вариантами далеко не исчерпываются способы, какими изготавливают подобное устройство. Для завершения работ необходимо заварить вырезанное отверстие, и прямоток для автомобиля можно считать готовым.
Дополнительная информация
Для лучшего понимания изложенного материала необходимо подчеркнуть, что мы, рассматривая, как сделать прямоток на машину своими руками, говорили об изготовлении именно глушителя, а не всей выхлопной системы. На самом деле именно она, причем в полном объеме, называется прямотоком. Подобное устройство изначально проектировалось для спортивных автомобилей с целью повышения их мощности, и изготовить его самостоятельно вряд ли представляется возможным.
Нужный результат получался благодаря целому комплексу мер, затрагивающих буквально все элементы автомобиля: распредвал, камеры сгорания, входной и выходной коллекторы, пути отвода газов (их форму, длину и расположение) и глушители. И солидный, басовитый звук работающего мотора был лишь сопутствующим фактором настоящей прямоточной системы выхлопа. На самом деле целью создания подобного устройства было максимальное использование мощности мотора и снижение ее потерь при работе двигателя.
И добивались этого, как уже было сказано, целым комплексом мер, реализовать которые обычному пользователю в гараже невозможно. Так что не надо строить иллюзий, что обзаведясь глушителем, в чем-то отличающимся от штатного, вы значительно увеличили мощность двигателя и улучшили динамику автомобиля. Итогом всех подобных работ будет в лучшем случае изменение звука его выхлопа. Хотя если это является вашей целью, то вы добьетесь нужного результата.
Прямоточный глушитель, или как его обычно называют, прямоток, при установке на серийный автомобиль предназначен для изменения звука работающего мотора. Причины, по которым это делается, у каждого могут быть свои. Но стоит отдавать себе отчет, что существуют определенные нормы к уровню звукового давления, допустимого для автомобиля, при превышении которых ТС не допускается к эксплуатации. А также, что значительный шум от работающего мотора вызывает беспокойство окружающих и соседей.
Многие модификации в автомобиле выполняются, чтобы привлечь внимание окружающих. Чаще всего это косметические изменения, но есть одно функциональное обновление, которое пользуется популярностью среди любителей автомобильного тюнинга. Оно позволяет водителю не только заявить о себе окружающим, но и улучшить мощностные характеристики автомобиля. Речь идет об установке прямоточного глушителя, который принято называть прямотоком. В рамках данной статьи мы посмотрим, как установить прямоток на автомобиль, а также, какие это несет плюсы и минусы.
Рекомендуем прочитать:
Ремонт глушителя своими руками
Как сделать прямоток своими руками
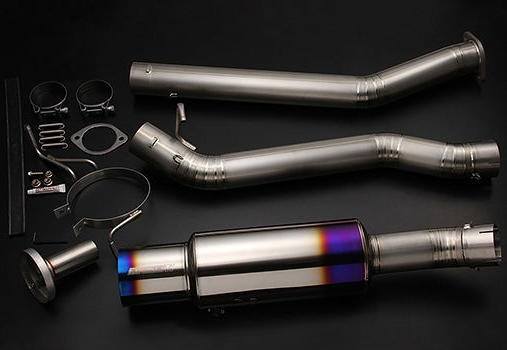
 Хорошая прямоточная система, выпускаемая производителями спортивных автомобилей, стоит серьезных денег, и желание сделать прямоток самостоятельно вполне понятно. Если смотреть на подобные аксессуары подробно, то можно заметить, что они представляют собой стандартный выхлопной выпуск с измененной конструкцией – сглаженные изгибы и малое число сварных швов. За счет подобного строения выхлопной системы автомобилю становится проще справляться с выбросом отработавших газов в атмосферу.
Сделать прямоток своими руками не так уж и сложно, как и установить его на автомобиль, но следует понимать, что подобное вмешательство в конструкцию машины по-своему сказывается на различных моделях. Чаще всего самодельную прямоточную систему устанавливают на «автомобили выходного дня», которые были приобретены, чтобы проводить над ними различные эксперименты.
Чтобы сделать прямоток самостоятельно, потребуется: металлическая труба с толщиной стенок не менее 3 миллиметров, сварочный аппарат, дрель, болгарка (для резки по металлу), нержавеющая сталь (чаще всего используются металлические губки для мытья посуды – около 50 штук).
Процесс самостоятельного производства прямотока следующий:
- Необходимо снять с автомобиля установленный глушитель и вскрыть резонатор. Для этого возьмите болгарку и сделайте отверстие по всей длине резонатора, а после разведите в стороны металлические листы, будто вскрывая консервную банку;
- После этого вы будете видеть все внутренности резонатора, который состоит из двух частей трубы и нескольких ребер жесткости. Все это предстоит вырезать из резонатора «под ноль», чтобы осталась непосредственно его металлическая оболочка. Вырезать удобнее всего при помощи болгарки, но приготовьтесь к тому, что займет это немало времени. Удаляя куски труб, оставьте с каждой стороны по 3-4 сантиметра, чтобы позже было удобнее наваривать модифицированные варианты выхлопа;
- Далее берем трубу такого же диаметра, как трубы, оставшиеся торчать в резонаторе с двух сторон. Обрезаем ее таким образом, чтобы ее длины хватило для установки в резонатор между обрезанными кусками и приварке с помощью сварочного аппарата. Здесь важно помнить правило: «Семь раз измерь, один раз отрежь». Если неверно изменить, и отрезанный размер трубы окажется меньше по длине, чем необходимо, придется резать новый кусок – складывать данную деталь из нескольких обрезков труб запрещено;
- Когда будет отрезана труба необходимой длины, надо приступить к ее модернизации. Для этого возьмите дрель небольшого диаметра и наделайте в данном куске трубы множество дырок. При этом оставьте по 3-4 сантиметра трубы с каждой стороны, чтобы после можно было обеспечить надежную сварку. Если ваша дрель не справляется с трубой, можно воспользоваться болгаркой и сделать на трубе множество надрезов через каждые 1,5-2 сантиметра.
- После этого необходимо наварить дырявый кусок трубы на части труб, которые остались торчать в резонаторе;
- Когда кусок трубы будет надежно приварен, необходимо забить весь резонатор сетчатой нержавеющей сталью. Для этого возьмите 50 приобретенных металлических губок для мытья посуды и начните их укладывать в резонатор, забивая все свободное пространство.
Внимание: некоторые губки могут идти с импровизированными «крючками», сделанными из бумаги, пластика или ткани. Такие элементы обязательно удалить с металла перед его укладкой в резонатор.
- Далее закройте резонатор и надежно приварите крышку;
- На этом создание прямотока своими руками можно считать завершенным. Остается установить автомобильный глушитель на место.
Важно отметить, что данный способ лишь один из многих вариантов самостоятельного создания прямоточной трубы из имеющегося глушителя. Некоторые автолюбителю собирают прямоток с нуля, что значительно дороже по затратам и более трудоемко. Подобная модификация простая, и ее сможет выполнить даже водитель без опыта.
Плюсы и минусы установки прямотока на автомобиль
 Установка прямоточной системы несет в себе как плюсы, так и минусы. Каждый автомобилист для себя самостоятельно решает, насколько целесообразно модифицировать глушитель машины в пользу прямотока.
Плюсы прямотока:
- Если наваривается труба чуть большего диаметра, чем установлена изначально, удается увеличить пропускную способность отработавших газов. Увеличение продува приводит к повышению мощности двигателя, вплоть до 15%;
- Повышение срока эксплуатации глушителя. Чаще всего глушитель «с завода» выполняется не из лучших материалов, а при подобной модификации автомобилист может взять хорошие трубы, вплоть до титановых вариантов. Если вы хотите повысить «ресурс труб», то необходимо после заварки резонатора удалить болгаркой конец глушителя, и на его место припаять новую трубу, заранее ее хорошо зачистив и загрунтовав.
Минусы прямотока:
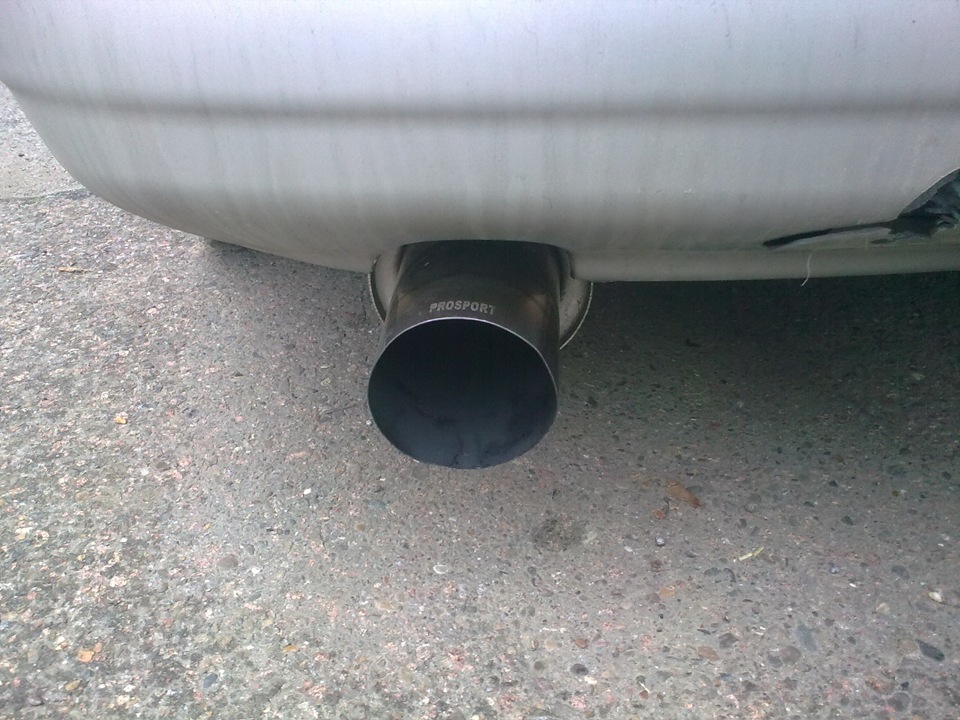
- Повышение шума. Многие автолюбители заносят данный параметр в плюс, и выполняют установку прямотока своими руками исключительно с целью повышения «рокота» автомобиля при движении;
- Уменьшение клиренса машины, если на глушитель наварены трубы большего диаметра;
- Проблемы при прохождении технического обслуживания. Повышенный шум и отсутствие катализатора приведут к тому, что возникнут проблемы при прохождении ТО;
Способ установки прямотока своими руками, описанный в данной статье, можно назвать «колхозным». В профессиональных гоночных автомобилях прямоточная система устроена гораздо сложнее, и она разрабатывается, в первую очередь, для повышения производительности двигателя. При этом подобный прямоток навряд ли принесет много пользы, лишь изменив звучание автомобиля, что, в большинстве случаев, и является целью самостоятельного тюнинга.
 Загрузка…
У некоторых средств передвижения, оснащенных двигателем внутреннего сгорания, глушитель является не самым надёжным элементом. Бывают случаи, когда они ржавеют, либо просто прогорают. Новые глушители оказываются не самыми долговечными, цена на них не самая приемлемая, да и ремонт может оказаться не долговечным.
Все эти факторы могут наталкивать на одну мысль, а не сделать ли глушитель своими руками. Ведь такой вариант может предостеречь от ежегодных покупок глушителя.
Система и изготовление глушителя на первый взгляд может казаться довольно несложной задачей.

Однако, прежде чем приступать к изготовлению глушителя своими руками своими руками, стоит пересмотреть видео из интернета и желательно, не одно.
Ведь данная система отвечает не только снижения шума, а так же за снижение токсичности и интенсивности выхлопных газов.

Есть несколько вариантов, как сделать глушитель своими руками. Выбор того, или иного варианта зависит от суммы, которую вы готовы потратить и от тюнинга глушителя.


Самодельный прямоточный глушитель сделанный своими руками: фото изготовления самоделки с описанием.
Умелец решил сделать прямоток для своего автомобиля, результат превзошёл все ожидания, работа автора представлена на пошаговых фото изготовления, также есть видео со звуком выхлопа прямотока.
Процесс изготовления прямоточного глушителя следующий:
Берём стальной лист толщиной 1,5 мм и сверлим в нём отверстия диаметром 5 мм, в результате получилось более 300 отверстий. Зачищаем металл.
Сгибаем пластину, в качестве шаблона используем трубу.
Нашлись шайбы подходящего диаметра, одеваем их на заготовку.
Обвариваем, делаем крепления.
Конструкция разборная, при необходимости прямоток можно разобрать, сменить набивку. Перфорация обернута алюминиевой сеткой для пайки пластика с размером ячейки 1 х 1 мм, стык пропаян с активным флюсом для фиксации.
Набивка глушителя сделана базальтовой ватой.
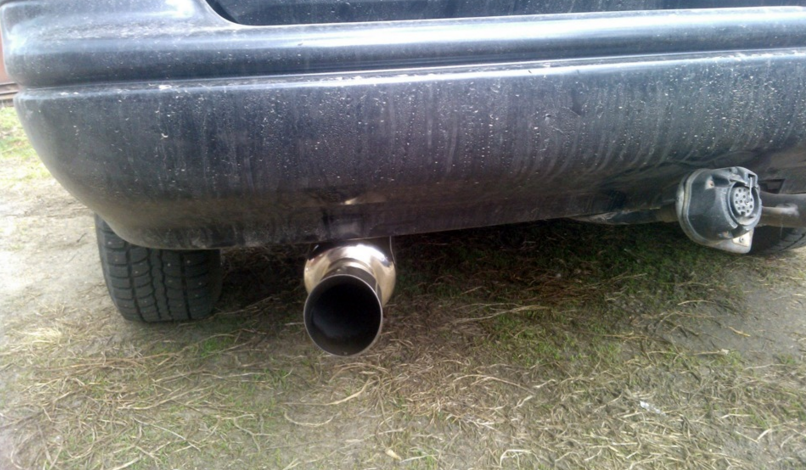
Результат работы.
В этом видео записан звук выхлопа прямоточного глушителя сделанного умельцем своими руками.
Автор самоделки: Роман Макаров. г. Калининград.
Поделиться в соц. сетях
90000 Find Your Way, Grow Resilient, and Enjoy Your Life by Debra Dane 90001 Starting out, starting over, or stuck? Making your way into this complicated world can be difficult. Flow Forward: Find Your Way, Grow Resilient, and Enjoy Your Life offers compact messages that guide you into a more resilient way to navigate life. Rather than suggesting major life overhauls, Debra Dane demonstrates how minor shifts in your thoughts and actions can create powerful, positive, change. She encourages you to make a series of these shifts so that you, naturally and fluidly, shape your life into an honest reflection of who you are and what you believe.Life’s bumps and blunders do not have to get in your way. You can do more than bounce back — you can Flow Forward. 90002 «a warm and substantive book from an excellent new writer.» 90003 -Rick Hanson, PhD, author of «Buddha’s Brain: The Practical Neuroscience of Happiness, Love, and Wisdom» 90004 90002 «a wonderful book filled with real life wisdom, compassion for others, and a recognition that being kind to ourselves may be one of the most important skills we develop in life. Anyone who has ever wondered how to successfully navigate the unpredictable waves of life will find some inspiration in these pages.It was especially gratifying to see that both the joys and disappointments of life are welcomed as necessary elements of a life lived well. Debra Dane helps the reader to realize that all experiences in life can be «messengers» and they can teach us how to live a life that is deeper, fuller, and more significant. «90004 90002 -William Compton, PhD, author of» Eastern Psychology: Buddhism, Hinduism, and Taoism «90004 90002» a well-rounded, empowering and unpretentious guide to success in life… Dane’s straightforward and no-nonsense approach to facing life’s ups and downs by learning to love and trust yourself and respect your feelings, or what Dane calls «Messengers,» is gentle and encouraging; while her language is clear and concepts flow easily from one to another. 90004 90002 The book is equally well organized to facilitate the fluidity of the book’s ideas. Each of the twelve chapters that address an aspect of internal development, such as Growing Self-Sufficient, Perseverance, Rejuvenating and Tolerance, are further subdivided into sections to make for easy-to-digest concepts and steps.These concepts are further illuminated by brief and vignettes that reveal the author’s own past struggles and epiphanies. 90004 90002 … Dane’s ideas about being everything you need to grow in the world, and her realistic views about pain, and obstacles in life that make one resilient are down-to-earth, credible and empowering. Metaphors about rejections being inoculations that make us more resilient, or temporary opportunities and assistance being ships or bridges that we use to move us from one place to another but do not rely on permanently, are both evocative and effective.90004 90002 … Overall, the coherent organization and unfussy language of the book make it conducive to a wide audience ranging from inspiring reading for high school students to adults. «90004 90002 -IndieReader 90004.90000 HCP IS / HCI — Enabling Integration Flow Trace Capability — Do It Yourself From Now On! 90001 90002 One of the most used features of HCI during the Development of your Integration Flows is the Trace Feature of your HCI. This has been described in multiple blogs and locations and if you are new to HCI would suggest reading through this blog on how HCI Tracing Works — Blog 1: Tracing Capability in SAP HANA Cloud Integration (HCI-PI) 90003 90002 If you have used this feature or tried to use this previously, the biggest frustration for this had been that you had to raise a Ticket to SAP to your HCI Tenant Operations Team and wait for the Tracing to be enabled.Also, over the past few months, SAP Tenant Operations Team had also enabled this feature for only 24 hours which meant, you would need to raise another ticket after 24 hours or use other alternates like the one described in my other blog — HCI — Payload Logging using Groovy Scripts — Part 1 90003 90002 Well, the good news is that SAP has listened to this frustration among HCI Developers and has provided the power back to the Developers. From now on you can enable the Trace of your Integration Flows directly and no need for SAP Support to get involved.90003 90002 90009 Enabling this is as simple as below steps, 90010 90003 90012 90013 Make sure your Tenant Node and your Eclipse Tools are 90009 updated 90010 to the latest versions. 90016 90013 Go to your 90009 Node Explorer 90010 and double click on your node. 90020 90016 90013 You will now see a New Tab called — 90009 Trace Configuration. 90010 Select this Tab 90025 90016 90013 Select your Integration Flow (CurrencyConvertorSOAP2SOAP in my case) and select the option 90009 Enable 90010.90030 90016 90032 90002 That’s it, with this you have enabled Trace for your Integration Flow and you can now monitor your Integration flow and view the Trace of your Integration Flow. 90009 Do note that your Trace is enabled only for 10 Minutes and post this your trace will expire. 90010 90036 Documentation on this feature and the roles required etc are available on this link: Trace Configuration Editor 90003 90002 This is an excellent feature to use when you perform your HCI Development and one that I think will make everyone’s life easy.Do note that the Trace is enabled only for 10 minutes and the payloads are deleted post the 10 minutes. Hence, for any long term payload logging it makes sense to follow the method discussed in my other blog: HCI — Payload Logging using Groovy Scripts — Part 1 90003 .90000 How to Do a Perfect Forward Lunge 90001 90002 If you’ve ever knelt down to tie your shoe or seen someone propose on a bended knee, you’re familiar with the lunge. A lunge is a single-leg bodyweight exercise that works your hips, glutes, quads, hamstrings, and core and the hard-to-reach muscles of your inner thighs. 90003 90002 Lunges can help you develop lower-body strength and endurance. They’re also a great beginner move. When done correctly, lunges can effectively target your lower-body muscles without placing added strain on your joints.90003 90002 While studies on this quintessential exercise are limited, we did dig up a study on swimmers. In 2015 року, researchers figured out that those who warmed up with either squats or lunges had faster swimming times — not too shabby for such a simple exercise. 90007 Cuenca-Fernández F, et al. (2015). Effect on swimming start performance of two types of activation protocols: Lunge and YoYo squat. DOI: 10.1519 / JSC.0000000000000696 90008 90003 90002 Ready to take the lunge? Master the move by following the steps below from personal trainer Greg Nieratka.Then keep reading to learn how to fix common mistakes and try some variations. 90003 90002 1. Stand tall with feet hip-width apart. Engage your core. 90003 90002 2. Take a big step forward with right leg. Start to shift your weight forward so heel hits the floor first. 90003 90002 3. Lower your body until right thigh is parallel to the floor and right shin is vertical. It’s OK if knee shifts forward a little as long as it does not go past right toe. If mobility allows, lightly tap left knee to the floor while keeping weight in right heel.90003 90002 4. Press into right heel to drive back up to starting position. 90003 90002 5. Repeat on the other side. 90003 90022 Tightrope lunge 90023 90002 Sure, lunges will challenge your balance, but there’s no reason to make it extra hard on yourself by narrowing your stance. Avoid bringing your front foot directly in line with your back foot, as if you’re walking on a tightrope. «This dramatically reduces stability,» Nieratka explains. 90003 90002 90027 The fix: 90028 Start with feet hip-width apart and maintain that gap as you step.90003 90022 Heel pop 90023 90002 We hate to break it to you, but «pop, lock, and drop it» should be reserved exclusively for the dance floor. When it comes to lunging, you’ll want to step forward enough so that your front heel will not pop off the floor. 90003 90002 «If your step is too shallow, your knee will travel forward past your foot, which puts unnecessary stress and strain on the knee,» Nieratka says. 90003 90002 90027 The fix: 90028 Take a larger step, plant your heel, and drive it into the floor to return to starting position.90003 90022 Upper-body drop 90023 90002 With a forward lunge, it’s OK to, well, shift your weight forward. But beware of bending at the hip and letting your upper body drop, which will put added strain on your knee. 90003 90002 «This is especially important if you are doing a lunge under load or with a weight,» Nieratka says. If your chest falls, you run the risk of losing balance, falling, or even dropping the weight on yourself — ouch! 90003 90002 90027 The fix: 90028 Engage your core.Think about pulling your belly button toward your spine. Also, keep your eyes forward instead of looking down. 90003 90002 Once you master proper form, you can add weight to make it more challenging — and rewarding. «The weight can be a barbell, one or two dumbbells, a kettlebell, or really any object you have at home,» says Nieratka. 90003 90002 Water bottles or a jug of laundry detergent totally counts too. Or try these lunge variations to switch up your routine. 90003 90022 Reverse lunge 90023 90002 Go easy on your knees with this lunge.Stand with feet hip-width apart, engage your core, and take a big step backward. 90003 90002 Activate your glutes as you bend front knee to lower your body so back knee lightly taps the floor while keeping upper body upright. Drive front heel into the floor to return to starting position. Repeat on the other side. 90003 90022 Walking lunge 90023 90002 Perform a forward lunge and walk it out. At the low point of the lunge, instead of returning to starting position, shift your weight forward and drive front heel into the floor.90003 90002 Rise up as you bring back foot forward to meet front foot. Reset feet to hip width. Repeat on the other side as you continue to move forward. 90003 90022 Lateral lunge 90023 90002 From starting position, take a big step to the right with right foot, keeping toes forward and feet flat on the floor. Send hips back, shift weight into right heel, and extend arms in front of you for balance. Push off right heel to return to starting position, then repeat on the other side. 90003 90022 Curtsy lunge 90023 90002 With hands on hips and feet wider than hip-width apart, step left leg behind right leg.Bend right knee, engage glutes, and lower until right thigh is parallel to the floor. Lightly tap left knee to the floor. Drive right foot into the floor to rise to starting position. Repeat on the other side. 90003 90022 Clock lunge 90023 90002 Lunge in all four directions on each side. Lunge forward with right foot, lunge laterally with right foot, reverse lunge with right foot, and then curtsy lunge, bringing right foot behind you. Repeat on the other side. 90003 90022 Walking lunge stretch 90023 90002 Perform a walking lunge by stepping right foot forward.At the bottom of the movement, hover left knee just above the floor and twist from your hips to the right over right knee. 90003 90002 Place hands on knee to help deepen the stretch. Hold for 2 seconds. Press into right heel and bring left foot to meet right to return to standing. Repeat on the other side. 90003 90022 Split lunge jump 90023 90002 Stand with feet hip-width apart. Instead of stepping, jump into a forward lunge position with right foot forward. Drive right heel into the floor to explosively jump up.90003 90002 Switch legs in midair so you land with left leg forward. Immediately lower into a lunge on the other side. For momentum, pump arms as if you’re running. 90003 90002 90027 Special thanks to personal trainer Greg Nieratka for demonstrating these moves for us. 90028 90003.90000 How planes work | the science of flight 90001 90002 Advertisement 90003 90002 90003 90006 90007 90008 90009 90010 90002 by Chris Woodford. Last updated: June 16, 2019. 90003 90013 We take for it granted that we can fly from one side of the world to the other in a matter of hours, but a century ago this amazing ability to race through the air had only just been discovered. What would the Wright brothers-the pioneers of powered flight-make of an age in which something like 100,000 planes take to the sky each day in the United States alone? They’d be amazed, of course, and delighted too.Thanks to their successful experiments with powered flight, the 90014 airplane 90015 is rightfully recognized as one of the greatest inventions of all time. Let’s take a closer look at how it works! 90003 90002 Photo: You need big wings to lift a big plane like this US Air Force C-17 Globemaster. The wings are 51.75m (169ft) wide-that’s just slightly less than the plane’s body length of 53m (174ft). The maximum takeoff weight is 265,352kg (585,000lb), about as much as 40 adult elephants! Photo by Jeremy Lock courtesy of US Air Force.90003 90019 How do planes fly? 90020 90002 If you’ve ever watched a jet plane taking off or coming in to land, the first thing you’ll have noticed is the noise of the engines. Jet engines, which are long metal tubes burning a continuous rush of fuel and air, are far noisier (and far more powerful) than traditional propeller engines. You might think engines are the key to making a plane fly, but you’d be wrong. Things can fly quite happily without engines, as gliders (planes with no engines), paper planes, and indeed gliding birds readily show us.90003 90002 90003 90002 Photo: Four forces act on a plane in flight. When the plane flies horizontally at a steady speed, lift from the wings exactly balances the plane’s weight and the thrust exactly balances the drag. However, during takeoff, or when the plane is attempting to climb in the sky (as shown here), the thrust from the engines pushing the plane forward exceeds the drag (air resistance) pulling it back. This creates a lift force, greater than the plane’s weight, which powers the plane higher into the sky.Photo by Nathanael Callon courtesy of US Air Force. 90003 90002 If you’re trying to understand how planes fly, you need to be clear about the difference between the engines and the wings and the different jobs they do. A plane’s engines are designed to move it forward at high speed. That makes air flow rapidly over the wings, which throw the air down toward the ground, generating an upward force called lift that overcomes the plane’s weight and holds it in the sky. So it’s the engines that move a plane forward, while the wings move it upward.90003 90002 90003 90002 Photo: Newton’s third law of motion explains how the engines and wings work together to make a plane move through the sky. The force of the hot exhaust gas shooting backward from the jet engine pushes the plane forward. That creates a moving current of air over the wings. The wings force the air downward and that pushes the plane upward. Photo by Samuel Rogers (with added annotations by explainthatstuff.com) courtesy of US Air Force. Read more about how engines work in our detailed article on jet engines.90003 90019 How do wings make lift? 90020 90002 In one sentence, wings make lift by changing the direction and pressure of the air that crashes into them as the engines shoot them through the sky. 90003 90037 Pressure differences 90038 90002 Okay, so the wings are the key to making something fly-but how do they work? Most airplane wings have a curved upper surface and a flatter lower surface, making a cross-sectional shape called an 90014 airfoil 90015 (or aerofoil, if you’re British): 90003 90002 90044 Photo: An airfoil wing typically has a curved upper surface and a flat lower surface.This is the wing on NASA’s solar-powered Centurion plane. Photo by Tom Tschida courtesy of NASA Armstrong Flight Research Center. 90003 90002 In a lot of science books and web pages, you’ll read an incorrect explanation of how an airfoil like this generates lift. It goes like this: When air rushes over the curved upper wing surface, it has to travel 90047 further 90048 than the air that passes underneath, so it has to go 90047 faster 90048 (to cover more distance in the same time). According to a principle of aerodynamics called Bernoulli’s law, fast-moving air is at lower pressure than slow-moving air, so the pressure above the wing is lower than the pressure below, and this creates the lift that powers the plane upward.90003 90002 Although this explanation of how wings work is widely repeated, it’s wrong: it gives the right answer, but for completely the wrong reasons! Think about it for a moment and you’ll see that if it were true, acrobatic planes could not fly upside down. Flipping a plane over would produce «downlift» and send it crashing to the ground. Not only that, but it’s perfectly possible to design planes with airfoils that are symmetrical (looking straight down the wing) and they still produce lift.For example, paper airplanes (and ones made from thin balsa wood) generate lift even though they have flat wings. 90003 90054 90002 «90047 The popular explanation of lift is common, quick, sounds logical and gives the correct answer, yet also introduces misconceptions, uses a nonsensical physical argument and misleadingly invokes Bernoulli’s equation. «90048 90003 90002 90014 Professor Holger Babinsky, Cambridge University 90015 90003 90063 90002 But the standard explanation of lift is problematic for another important reason as well: the air shooting over the wing does not have to stay in step with the air going underneath it, and nothing says it has to travel a bigger distance in the same time.Imagine two air molecules arriving at the front of the wing and separating, so one shoots up over the top and the other whistles straight under the bottom. There’s no reason why those two molecules have to arrive at exactly the same time at the back end of the wing: they could meet up with other air molecules instead. This flaw in the standard explanation of an airfoil goes by the technical name of the «equal transit theory.» That’s just a fancy name for the (incorrect) idea that the air stream splits apart at the front of the airfoil and meets up neatly again at the back.90003 90002 90003 90002 So what’s the real explanation? As a curved airfoil wing flies through the sky, it deflects air and alters the air pressure above and below it. That’s intuitively obvious. Think how it feels when you slowly walk through a swimming pool and feel the force of the water pushing against your body: your body is diverting the flow of water as it pushes through it, and an airfoil wing does the same thing (much more dramatically-because that’s what it’s designed to do). As a plane flies forward, the curved upper part of the wing lowers the air pressure directly above it, so it moves upward.90003 90002 Why does this happen? As air flows over the curved upper surface, its natural inclination is to move in a straight line, but the curve of the wing pulls it around and back down. For this reason, the air is effectively stretched out into a bigger volume-the same number of air molecules forced to occupy more space-and this is what lowers its pressure. For exactly the opposite reason, the pressure of the air under the wing increases: the advancing wing squashes the air molecules in front of it into a smaller space.The difference in air pressure between the upper and lower surfaces 90047 causes 90048 a big difference in air speed (not the other way around, as in the traditional theory of a wing). The difference in speed (observed in actual wind tunnel experiments) is much bigger than you’d predict from the simple (equal transit) theory. So if our two air molecules separate at the front, the one going over the top arrives at the tail end of the wing much faster than the one going under the bottom. No matter when they arrive, both of those molecules will be speeding 90047 downward 90048 -and this helps to produce lift in a second important way.90003 90002 How airfoil wings generate lift # 1: An airfoil splits apart the incoming air, lowers the pressure of the upper air stream, and accelerates both air streams downward. As the air accelerates downward, the wing (and the plane) move upward. The more an airfoil diverts the path of the oncoming air, the more lift it generates. 90003 90037 Downwash 90038 90002 If you’ve ever stood near a helicopter, you’ll know exactly how it stays in the sky: it creates a huge «downwash» (downward moving draft) of air that balances its weight.Helicopter rotors are very similar to airplane airfoils, but spin around in a circle instead of moving forward in a straight line, like the ones on a plane. Even so, airplanes create downwash in exactly the same way as helicopters-it’s just that we do not notice. The downwash is not so obvious, but it’s just as important as it is with a chopper. 90003 90002 This second aspect of making lift is a lot easier to understand than pressure differences, at least for a physicist: according to Isaac Newton’s third law of motion, if air gives an upward force to a plane, the plane must give an (equal and opposite) downward force to the air.So a plane also generates lift by using its wings to push air downward behind it. That happens because the wings are not perfectly horizontal, as you might suppose, but tilted back very slightly so they hit the air at an 90014 angle of attack 90015. The angled wings push down both the accelerated airflow (from up above them) and the slower moving airflow (from beneath them), and this produces lift. Since the curved top of the airfoil deflects (pushes down) more air than the straighter bottom (in other words, alters the path of the incoming air much more dramatically), it produces significantly more lift.90003 90002 90003 90002 How airfoil wings generate lift # 2: The curved shape of a wing creates an area of low pressure up above it (red), which generates lift. The low pressure makes air accelerate over the wing, and the curved shape of the wing (and the higher air pressure well above the altered air stream) forces that air into a powerful downwash, also pushing the plane up. This animation shows how different angles of attack (the angle between the wing and the incoming air) change the low pressure region above a wing and the lift it makes.When a wing is flat, its curved upper surface creates a modest region of low pressure and a modest amount of lift (red). As the angle of attack increases, the lift increases dramatically too-up to a point, when increasing drag makes the plane stall (see below). If we tilt the wing downward, we produce lower pressure underneath it, making the plane fall. Based on Aerodynamics, a public domain War Department training film from 1941. 90003 90002 You might be wondering why the air flows down behind a wing at all.Why, for example, does not it hit the front of the wing, curve over the top, and then carry on horizontally? Why is there a downwash rather than simply a horizontal «backwash»? Think back to our previous discussion of pressure: a wing lowers the air pressure immediately above it. Higher up, well above the plane, the air is still at its normal pressure, which is higher than the air immediately above the wing. So the normal-pressure air well above the wing pushes down on the lower-pressure air immediately above it, effectively «squirting» air down and behind the wing in a backwash.In other words, the pressure difference that a wing creates and the downwash of air behind it are not two separate things but all part and parcel of the same effect: an angled airfoil wing creates a pressure difference that makes a downwash, and this produces lift. 90003 90002 Now we can see that wings are devices designed to push air downward, it’s easy to understand why planes with flat or symmetrical wings (or upside-down stunt planes) can still safely fly. As long as the wings are creating a downward flow of air, the plane will experience an equal and opposite force-lift-that will keep it in the air.In other words, the upside-down pilot creates a particular angle of attack that generates just enough low pressure above the wing to keep the plane in the air. 90003 90037 How much lift can you make? 90038 90002 Generally, the air flowing over the top and bottom of a wing follows the curve of the wing surfaces very closely-just as you might follow it if you were tracing its outline with a pen. But as the angle of attack increases, the smooth airflow behind the wing starts to break down and become more turbulent and that reduces the lift.At a certain angle (generally round about 15 °, though it varies), the air no longer flows smoothly around the wing. There’s a big increase in drag, a big reduction in lift, and the plane is said to have 90014 stalled 90015. That’s a slightly confusing term because the engines keep running and the plane keeps flying; stall simply means a loss of lift. 90003 90002 90003 90002 Photo: How a plane stalls: Here’s an airfoil wing in a wind tunnel facing the oncoming air at a steep angle of attack.You can see lines of smoke-filled air approaching from the right and deviating around the wing as they move to the left. Normally, the airflow lines would follow the shape (profile) of the wing very closely. Here, because of the steep angle of attack, the air flow has separated out behind the wing and turbulence and drag have increased significantly. A plane flying like this would experience a sudden loss of lift, which we call «stall.» Photo courtesy of NASA Langley Research Center. 90003 90002 Planes can fly without airfoil-shaped wings; you’ll know that if you’ve ever made a paper airplane-and it was proved on December 17, 1903 by the Wright brothers.In their original «Flying Machine» patent (US patent # вісімсот двадцять одна тисяча триста дев’яносто три), it’s clear that slightly tilted wings (which they referred to as «aeroplanes») are the key parts of their invention. Their «aeroplanes» were simply pieces of cloth stretched over a wooden framework; they did not have an airfoil (aerofoil) profile. The Wrights realized that the angle of attack is crucial: «In flying machines of the character to which this invention relates the apparatus is supported in the air by reason of the contact between the air and the under surface of one or more aeroplanes, the contact -surface being presented at a small angle of incidence to the air.»[Emphasis added]. Although the Wrights were brilliant experimental scientists, it’s important to remember that they lacked our modern knowledge of aerodynamics and a full understanding of exactly how wings work. 90003 90002 Not surprisingly, the bigger the wings, the more lift they create: doubling the area of a wing (that’s the flat area you see looking down from above) doubles both the lift and drag it makes. That’s why gigantic planes (like the C-17 Globemaster in our top photo) have gigantic wings.But small wings can also produce a great deal of lift if they move fast enough. To produce extra lift at takeoff, planes have flaps on their wings they can extend to push more air down. Lift and drag vary with the 90047 square 90048 of your speed, so if a plane goes twice as fast, relative to the oncoming air, its wings produce 90047 four 90048 times as much lift (and drag). Helicopters produce a huge amount of lift by spinning their rotor blades (essentially thin wings that spin in a circle) very quickly.90003 90037 Wing vortices 90038 90002 Now a plane does not throw air down behind it in a completely clean way. (You could imagine, for example, someone pushing a big crate of air out of the back door of a military transporter so it falls straight down. But it does not work quite like that!) Each wing actually sends air down by making a spinning 90014 vortex 90015 (a kind of mini tornado) immediately behind it. It’s a bit like when you’re standing on a platform at a railroad station and a high-speed train rushes past without stopping, leaving what feels like a huge sucking vacuum in its wake.With a plane, the vortex is quite a complex shape and most of it is moving downward-but not all. There’s a huge draft of air moving down in the center, but some air actually swirls upward either side of the wingtips, reducing lift. 90003 90002 90044 Photo: Newton’s laws make airplanes fly: A plane generates an upward force (lift) by pushing air down toward the ground. As these photos show, the air moves down not in a neat and tidy stream but in a vortex. Among other things, the vortex affects how closely one plane can fly behind another and it’s particularly important near airports where there are lots of planes moving all the time, making complex patterns of turbulence in the air.Left: Colored smoke shows the wing vortices produced by a real plane. The smoke in the center is moving downward, but it’s moving upward beyond the wingtips. Right: How the vortex appears from below. White smoke shows the same effect on a smaller scale in a wind tunnel test. Both photos courtesy of NASA Langley Research Center. 90003 90019 How do planes steer? 90020 90037 What is steering? 90038 90002 Steering anything-from a skateboard or a bicycle to a car or a jumbo jet-means you change the direction in which it’s traveling.In scientific terms, changing something’s direction of travel means you change its 90014 velocity 90015, which is the speed it has in a particular direction. Even if it goes at the same speed, if you change the direction of travel, you change the velocity. Changing something’s velocity (including its direction of travel) means you 90014 accelerate it 90015. Again, it does not matter if the speed stays the same: a change in direction 90047 always 90048 means a change in velocity and an acceleration.Newton’s laws of motion tell us that you can only accelerate something (change its speed or direction of travel) by using a force-in other words, by pushing or pulling it somehow. To cut a long story short, if you want to steer something you need to apply a force to it. 90003 90002 90003 90002 Photo: Steering a plane by banking at a steep angle. Photo by Ben Bloker courtesy of US Air Force. 90003 90002 Another way of looking at steering is to think of it as making something stop going in a straight line and start going in a circle.That means you have to give it what’s called a centripetal force. Things that are moving in a circle (Or steering in a curve, which is part of a circle) always have something acting on them to give them centripetal force. If you’re driving a car round a bend, the centripetal force comes from friction between the four tires and the road. If you’re cycling around a curve at speed, some of your centripetal force comes from the tires and some comes from leaning into the bend. If you’re on a skateboard, you can tilt the deck and lean over so your weight helps to provide centripetal force.In each case, you steer in a circle because something provides the centripetal force that pulls your path away from a straight line and round into a curve. 90003 90037 Steering in theory 90038 90002 If you’re in a plane, you’re obviously not in contact with the ground, so where does the centripetal force come from to help you steer around a circle? Just like a cyclist leaning into a bend, a plane «leans» into a curve. Steering involves 90014 banking 90015, where the plane tilts to one side and one wing dips lower than the other.The plane’s overall lift is tilted at an angle and, although most of the lift still acts upward, some now acts sideways. This sideways part of the lift provides the centripetal force that makes the plane go round in a circle. Since there’s less lift acting upward, there’s less to balance the plane’s weight. That’s why turning a plane in a circle will make it lose lift and altitude (height) unless the pilot does something else to compensate, such as using the elevators (the flight control surfaces at the back of the plane) to increase the angle of attack and therefore raise the lift again.90003 90002 90003 90002 Artwork: When a plane banks, the lift generated by its wings tilts at an angle. Most of the lift still acts upward, but some tilts to one side, providing centripetal force that makes the plane steer round in a circle. The steeper the angle of the bank, the more the lift is tilted to the side, the less upward force there is to balance the weight, and the greater the loss of altitude (unless the pilot compensates). 90003 90037 Steering in practice 90038 90002 There’s a steering control in the cockpit, but that’s the only thing a plane has in common with a car.How do you steer something that’s flying through the air at high speed? Simple! You make the air flow in a different way past the wings on each side. Planes are moved up and down, steered from side to side, and brought to a halt by a complex collection of moving flaps called 90014 control surfaces 90015 on the leading and trailing edges of the wings and tail. These are called ailerons, elevators, rudders, spoilers, and air brakes. Now flying a plane is very complex and I’m not writing a pilot’s manual here: this is just a very basic introduction to the science of forces and motion as they apply to airplanes.For a simple overview of all the different plane controls and how they work, take a look at Wikipedia’s article on control surfaces. NASA’s basic introduction to flight has a good drawing of airplane cockpit controls and how you use them to steer a plane. You’ll find much more detail in the official FAA Pilot’s Handbook of Aeronautical Knowledge (Chapter 6 covers the flight controls). 90003 90002 One way to understand control surfaces is to build yourself a paper plane and experiment. First, build yourself a basic paper plane and make sure it flies in a straight line.Then cut or rip the back of the wings to make some ailerons. Tilt them up and down and see what effect they have in different positions. Tilt one up and one down and see what difference that makes. Then try making a new plane with one wing bigger than the other (or heavier, by adding paperclips). The way to make a paper plane steer is to get one wing to generate more lift than the other-and you can do this in all kinds of different ways! 90003 90019 More parts of a plane 90020 90002 90003 90002 Photo: The Wright brothers took a very scientific approach to flight, meticulously testing every feature of their planes.Here they are pictured during one of their first powered flights on December 17, 1903. Courtesy of NASA / Internet Archive. 90003 90002 Here are some other key parts of planes: 90003 90006 90008 90014 Fuel tanks 90015: You need fuel to power a plane-lots of it. An Airbus A380 holds over 310,000 liters (82,000 gallons) of fuel, which is about 25,000 times as much as a typical car! The fuel’s safely packed inside the plane’s huge wings. 90009 90008 90014 Landing gear 90015: Planes take off and land on sturdy wheels and tires, which are rapidly retracted into the undercarriage (the plane’s underbody) by hydraulic rams to reduce drag (air resistance) when they’re in the sky.90009 90008 90014 Radio and radar 90015: The Wright brothers had to fly their pioneering Kitty Hawk plane entirely by sight. That did not matter because it flew near the ground, stayed in the air for only 12 seconds, and there were no other planes to worry about! These days, the skies are packed with planes that fly by day, by night, and in all kinds of weather. Radio, radar, and satellite systems are essential for navigation. 90009 90008 90014 Pressurized cabins 90015: Air pressure falls with height above Earth’s surface-that’s why mountaineers need to use oxygen cylinders to reach extreme heights.The summit of Mount Everest is just under 9km (5.5 miles) above sea level, but jet planes routinely fly at greater altitudes than this and military planes have flown almost three times higher! That’s why passenger planes have pressurized cabins: ones into which heated air is steadily pumped so people can breathe properly. Military pilots avoid the problem by wearing face masks and pressurized body suits. 90009 90010 90006 90007 90008 90009 90010 90019 Acknowledgements 90020 90002 I’m very grateful to Steve Noskowicz for invaluable help in refining and improving my explanation of how wings generate lift.90003 .